New Blogger Templates

Sunday 27 November 2011

BOOST YOUR WEBSITE WITH INTERACTIVE FEATURES of wibiya toolbar

Adding the Wibiya toolbar to your website allows you to easily increase page views and user engagement, and promote your content. Wibiya offers a variety of free apps, enabling you to extend your content’s exposure and provide users with a more interactive experience of your website.


Friday 25 November 2011

Automatic Meta Tag Generator According To Keywords Used In Webpage

keywords 

U can generate the meta tag and meta description automatically according to the words and keywords you used in your web pages or blog site. This means you will have an effective meta tag according to you contents. Isn’t it wonderful? After searching in world wide web for many hours I finally landed on a site which offers this function. The site is a German site as understood from the domain [.de]


Put your website address on the URL box and select english if your site’s content is in english and click “Do it” button. In the next page you will have the options to use the words as meta tag used your on your site or blog.


add dynamic meta tag disctiption (that will boost your page optimization)


meta tags are very important for page optimization for blog and web site both One of the greatest disadvantage of using blogger is its lack of support for unique description for each blog post which can severely affect your on page SEO.While the method we are describing here will provide you with the ability to give a unique meta tag description moreover it will be dynamic .So you don’t have to worry for writing a unique meta description for each of your earlier and future blog post.We have been using this method on our blogger blog and after implementing it found an increase in our search engine rankings.Now here is the step by step tutorial on how to add a dynamic meta description in blogger.


1.    Login into your blogger account.

2.    Click on Design and then on HTML.

3.    If already have added some meta description tag then delete it and add the following code.

4.    Add the following code
<meta expr:content='data:blog.pageName + data:blog.title + data:blog.pageName' name='Description'/>

5.    This code will insert your post tittle in each description which not only makes your blogger post description unique but also help you out in onpage seo because you usually have your keywords in your blog post tittle.

6.    You can use the “ data:blog.pageName +  “ as many times as you want in your blogger descprtion .But if you use it more then once then it can also have an adverse effect.So,don't overuse it.

how to add facebook plugin to blog,worpress, web site

Comments Box is a social plugin that enables user commenting on your site. Features include moderation tools and distribution.

  
Goto Facebook comments plugin
and do following steps


Tuesday 22 November 2011

again some cool widgets

Related Posts Widget
Display related posts beneath each of your blog posts. Links are displayed based on labels given to each post.

Tag Cloud Widget
Display a simple tag cloud in your blog's sidebar. The tags are displayed based upon the labels given to each post.

Random Posts Button
This widget creates a link for your template that directs users to a random post when clicked on.

Change the Favicon
Are you tired of the regular organge favicon provided by blogger? This tutorial will teach you how to display your own customized favicon.

Top Commentators Widget
Reward your readers for commenting on your blog with this widget. The widget displays the names of the top commentators and will direct you to their website when clicked on.

Change the Title Tags for More Search Engine Traffic
This tutorial teaches you how to make your post title show up before your blog title in Google search results. This is very important when it comes to Search Engine Optimization!

Recent Posts with Thumbnails
Grab your readers attention with an appealing recent posts widget which includes thumbnails.

Recent Comments Widget
Make your blog look alive by displaying recent comment discussions.

Digg Vote Button
Let your Digg readers Digg your posts directly from your blog with this handy little widget.

Search Bar for Blogger
This widget displays a small search bar in your blog's footer. Your readers will be able to easily search your blog for specific content.

Table of Contents
Allow your readers to easily navigate through your site with an interactive Table of Contents.


Blog Widgets

Facebook Widgets
Connect your blog or website with your Facebook Account using these powerful widgets.

Currently Online Readers Widget
A small widget which display how many users are currently online. The widget also indicates which pages are currently being looked at.

Contact Admin Widget
Let your users stay in touch with you with this contact form.

Post Ratings by Outbrain
Let your users give your post a star rating from one to five.

Social Bookmarking Widget
This widget lets your users to easily bookmark your blog posts at the bottom of each post.

PageRank Buttons
 Showoff your blog's Google Page Rank with this small widget.

Google Talk Chat Back Badge
A Google Talk chatback badge will let visitors to your web page chat with you. They'll be able to chat with you whenever you're signed in to Google Talk.

Twitter Widget Tools
A great post containg 502 twitter widget tools, buttons, and icons for Engaging your followers.

PayPal Donation Button
If you've got a loyal reader community that might be willing to sponsor you as a blogger, this would be the way.

Google Buzz Share Button
Another way to share your content across a great social network.

Performancing Ads Widget
Another way to make some money from your blog by letting others advertise on your site.

Sudoku Puzzle Widget
Have some fun on your blog with this interactive sudoku game that will easily go in the sidebar.  The sudoku has five different levels of difficulty.

some great widgets for your blog


Widgets are a handy, easy and simple way to add some flare to your blog. Whether you’d like to display the number of currently online visitors to your site or simply the weather report for Los Angeles, you can do it with widgets. We’ve assembled a list of 50 useful or simply cool widgets for your pleasure. And remember, the first rule of widgetizing your blog is – don’t overdo it!


MyBlogLog’s Recent Readers – this widget can easily be called a hit amongst blog owners; its popularity even managed to convince Yahoo into buying MyBlogLog. The widget lets you see the avatars of recent visitors to your blog, provided they’re also members of MyBlogLog.

Mashable – get the latest social networking news from this very site.

Flickr Flash Photo Stream Badge – display images from your Flickr profile with a handy Flash photo stream.

Preview Anywhere – see a live preview of outgoing links in a small popup which activates on mouseover. Some find this annoying, while others might find it useful.

Twitter Badge – if your life is so interesting that everyone must know what you’re up to all the time, then a Twitter badge is the ideal counterpart to your blog. It’ll proudly displays your recent tweets.

Digg News – display the latest Digg links on your blog. Themeable and fully customizable.

FEEDJIT – real time traffic data directly in your blog’s sidebar.

LineBuzz – inline comments for your blog. Very handy for blogs with frequent lively discussions.

Flixn – display a stream directly from your webcam, so your blog visitors can always see what you’re up to.

3Jam – lets your visitors send messages to your mobile phone, without them knowing your phone number.

Jaxtr – with Jaxtr, your visitors can actually call you to your mobile phone; again, your number stays private.

LinkedInABox – show off your LinkedIn profile. Perfect for personal blogs.

Box Widget – enable visitors to use box.net’s online storage directly on your web site.

Price of gas – displaying gas prices on your blog might seem unnecessary to some, but it’s cool if you have a traffic/travel related blog.

iBegin Weather Widget – Display weather information in your sidebar. Just like with Price of Gas, works great with travel-related blogs.

ClockLink – display time in various time zones with these nifty Flash clocks.

Film Loops – display the latest loops from your FilmLoops account.

Daily Painters – display paintings from famous painters on your blog.

WhoLinked – show your visitors which sites have recently linked to your web site. Works with all major blog platforms.
Criteo AutoRoll – displays links to blogs similar to your blog.

Bitty Browser – embed a cute, fully functional mini web browser to your blog.

Leafletter – create a mini website and embed it into your blog
WikiSeek – search Wikipedia with this simple widget.

FeedCount – show off the number of visitors to your blog with this handy little button.

Technorati Link Count – display the number of links your website has from one of the biggest blog authorities – Technorati.

MyPageRank – another good way to show how “big” your blog is is to show off your Google PageRank.

CheckPageRank – in addition to showing your PageRank, this widget also shows your Alexa ranking.

BlinkxIt – embed a link to related videos directly into your website.

Skype button – display your Skype online/offline status on your blog.

RockYou Horoscope – not something I would personally use, but some people are into horoscope. Hell, most people are into horoscope. Anyway, this widget shows horoscope (doh!) and does it in a nicely designed colorful box.

del.icio.us Tagometer – display how many times have del.icio.us users saved your page.

del.icio.us Linkrolls – this badge shows your latest bookmarks from del.icio.us.

Timelines – need to create a timeline? Seek no further. This widget makes it really easy.

PollDaddy – PollDaddy lets you create beautiful polls in no time, and display them at your blog.

Vizu – another poll-making widget, compatible with all major blog platforms.

AnswerTips – display definitions from Answers.com for various terms on your blog. The definitions are
shown in bubbles which are activated on doubleclick.

AnswerBoxes – give your visitors a chance to enter a term themselves, and get a definition from Answers.com

Now Playing – if you got to share your current playlist contents with the world, Sigamp will do the trick.
 Works with most popular music players, including Foobar, Winamp, iTunes and others.

BuzzBoost – display headlines from your RSS feed on any website.

LibraryThing – show off the latest books you’ve been reading.

Plaxo Address Book – let your most faithful visitors access their address books direclty from your site.

AuctionAds – a widget that displays auctioned items on eBay, and gives you a percentage of the price paid when sometimes buys an item.

aStore – similar to AuctionAds, only for Amazon. Create a mini-store on your site and receive profit when someone buys an item through your store.

Plazes – show your current location on a Plazes map.

Stockalicious – track your portfolio with this widget, and share it with others. Let everyone know how much money you’ve lost.

Yahoo! For Good – create a charity badge and ask for donations for a worthy cause.

Giftspace – your friends never know what to buy you for birthday? Let them know what you really want with this nifty widget.

MixMap – see where are the visitors to your MySpace profile from on a map.

Google Map Widget – display a searchable Google Map on your website.

Google Video Search – add a video search form and selected videos to your web site.

Odeo player – display an Odeo player for and podcast right there in your sidebar.


Sunday 20 November 2011

Blogger How to add a PAYPAL DONATE button to your blogspot blog


Adding a Paypal donation button to your blog will give your blog readers a chance to support you by donating a few bucks. If you don’t have a paypal account yet, you can get a Free Paypal account here.

1. First,Log in to your Paypal account.
paypal donate button in blogger tips
2. Click on the ‘Merchant Services’ tab (see at the top of the page).
button paypal
3. Scroll down the window and you will see an option “Donations” in the right sidebar. Click on it!
blogger tips and tricks paypal button
4. Now,you will see some options like Donation name/service ,donation id,etc etc… The first field (Donation name/service) is the only thing that is required and all the remaining fields are optional.
Enter that first field,choose a button style,scroll down the window and click on “Create a button Now”

5. Now,you will see some html code… Copy it and sign in to your blogger dashboard »» Click on the layout »» Add a Page element »» html/javascript »» and paste that html code and SAVE THE CHANGES.
0Adding a Paypal donation button to your blog will give your blog readers a chance to support you by donating a few bucks. If you don’t have a paypal account yet, you can get a Free Paypal account here.

1. First,Log in to your Paypal account.

paypal donate button in blogger tips
2. Click on the ‘Merchant Services’ tab (see at the top of the page).
button paypal
3. Scroll down the window and you will see an option “Donations” in the right sidebar. Click on it!
blogger tips and tricks paypal button
4. Now,you will see some options like Donation name/service ,donation id,etc etc… The first field (Donation name/service) is the only thing that is required and all the remaining fields are optional.
Enter that first field,choose a button style,scroll down the window and click on “Create a button Now”

5. Now,you will see some html code… Copy it and sign in to your blogger dashboard »» Click on the layout »» Add a Page element »» html/javascript »» and paste that html code and SAVE THE CHANGES.

Blogger How to Track Your blog Visitors?


As a new blogger (webmaster), it is always interesting to know how many people are visiting your blog/site, pageviews, where they are coming from,which sites are referring,how many are coming via Search Engines (google,yahoo,etc) and what they are typing in the search engines to visit your site.
How to Track Your Blogger blog Visitors?
These stastistics are very handy interms of improving your blog and it is for FREE
If you search the google,you will find hundreds of sites which will track the visitors of your blog/site.But,some sites will provide more information about your visitors than the others.
So, how to do this?
Here are the best tracking sources interms of the feautures they provide.
Note:One thing is common for all the tracking sites.First you need to register,and provide the necessary information about your blog/website.Next,they will give you a html code and you have to embed it in your blog.

How to do that in blogger?
1.Sign in to your blogger dashboard.
2.Click on the 'layout' link next to your blog name.
3.Click on the "Add a Page element"
4.Select "html/javascript" and past the code they provide and SAVE THE CHANGES.

From then,your blog will be tracked and you can check your blog stats from time to time after logging in to your registrate's website.

So,here are the good ones:-

Sitemeter.com: This one is one of the Most Popular tracking source.This is as simple as 123. Just create an account,copy the code from your account and paste it in your blog as suggested above.
You have also the option to keep your blog stats PRIVATE.
They will give you the stats on how many pageviews(hits) per day,unique visitors,geolocation of the visitors,how many users online,and much more...As it is simple(not much animation),you site will load as fast as it is before.Stats are updated hourly.
You can setup a Free Account here

Histats.com: Unlike the Sitemeter which is very simple, this site will have very cool and animated counters.
Tracking is updated every 5 minutes.I personally using this site for my blogs.Like Sitemeter,
this is also have the option to keep your site stats PRIVATE.
They will provide Animated graphs about your site visitors and fully animative.
You can register with them here

Statcounter.com: Same here!As in the name,it is a stats counter.It is fast,free,and quick loading.
Invisible tracking is available and no ads on your site.All the stats are in real time and super fast.It is not much animated as histats.com.They will provide pageviews,unique vistors,visitors activity,search engine wars,keyword analysis,and many more

Get free SMS Alerts on ZONG Mobilink Ufone Telenor Warid Through Comment


A free contact form that alerts you by text message on your cell phone when a user submits the form. Very handy when you want to be sharp and prompt in responding to your website users. It’s easy to setup and it’s free.
Blogger Tip Free SMS


A user fills out a contact form like usual on your website and when they click submit, you get an email from the user and an alert to your cell phone.

No need to know coding the video will walk you through setting it up. And all the files you need are available for download on this site.

Get sms text message alerts when a user submits the form
Very simple to integrate into your existing site
Easy to customize and change the look
Of course it’s free

For those who are running their blogs on Blogger, they can get sms alerts with their Zong connection when someone of their readers leaves a comment on their blog. It is free as long as Zong’s email to sms service is free.
Ufone customers may also use their Email to sms service, but Ufone’s email to sms service is not free. With Ufone to get your email to sms id (number@ufone.com) you need to activate your info-services account from Ufone web, which charges 1.Rs+tax/day, where as Zong’s email to sms service is by default activated on all Zong numbers for free.

It is easy to setup Zong sms alerts for blogger comment notifications, that when your blog posts receive any comments, then from blogger a sms notification will be sent to your Zong number.
This trick will only work for those who are using blogger default comments system, will not work with disqus, js-kit etc

Just follow these easy steps:

- Login to your Blogger account.
- From dashboard go to the settings of your blog for which you want to set up sms alerts.
- Go to the comments settings page, at the bottom you will see an option for “Comment Notification Email”, just put your Zong email to sms id there (for example number@zongsms.pk, 031########@zongsms.pk) and Save settings.

Take a look at the below screenshots to get an idea about this service. This service will keep you updated about the interaction on your blog and you can reply to your readers on time.

Saturday 19 November 2011

Freelancing (The best way to earn online)


The life of a freelance worker before the Internet was a very different thing to what it is today. In the past, any freelancer would need great mobility or a very sympathetic pricing plan from their phone company. In order to get around to pitch yourself to potential customers, you would require boundless energy, and an ability to deal with being told “no” face to face or over the phone. So much of freelancing is about speculation, after all. You can try and sell yourself a hundred times and could be told “no” a hundred times – and the chances are that you will get at least fifty rejections even if you are excellent. Although the Internet offers no guarantees of acceptance, it does make things a bit more equal for the freelancer.
There are many sites on the Internet that offer the opportunity for freelancers to pitch to potential customers on specific jobs – a searchable database means that you can even check for jobs that match up perfectly with your own specific skills and abilities. You can name your price and tell the customer how quickly you can turn a job around. The days of having to get out there, pound the pavement and then be told “sorry, we’re not
interested” are more or less over. Not to mention that the Internet provides a truly monumental research tool for the jobs that require a bit of extra knowledge. The internet is nothing less than a launch pad from which to set your career in motion.
There are lots of sites for freelancing like Elance.com, Freelancers.com, Scriptlance.com
But personally I recommend you ODesk.com because I tried lots of freelance sites but I find ODesk is best sites for free lancers because all the things on ODesk are very user friendly like from finding a job to its payment method like no one can seize your payment because of a time and work tracking software(ODesk Team) just run this software while working on the project and it will record your time and activity so the buyer and ODesk team can easily review what you are doing.
ODesk Payment Methods:
If we talk about payment method ODesk offers you 4 payment methods through which you can withdrawal you earnings.
The first payment method is ODesk Payoneer Master Card you can get your by submitting some info about you like you Photo Id card or any other document.2$ is the fees to transfer your earnings from ODesk to payoneer account and 10$ is the first time activation fees and 3$ is the withdrawal fees to get hard cash.You can signup to payneer account only from ODESK Account
The second and most cheap and reliable payment method is Moneybookers, You can transfer your earning from ODesk to moneybookers just only for 1$ and the satisfying thing about moneybookers is it don’t have any charges like activation and maintenance.
It also have lots of options like you can add Ebay seller account, online shopping, use moneybookers international sms sevice etc.Now the important thing is how can I withdraw my earnings from moneybookers? So the answer is you can add you bank account t moneybookers or if you don’t want to add your bank account so add your any Master/Visa Debit or Credit card and withdraw your earnings on one click.
The third payment method is Direct Deposit(ACH) unfortunately this method is not for all countries around the world its only for the citizens of US.
The Fourth and last payment method is Bank Wire you can withdraw your earnings through bank wire, if you don’t have a Dollar account so you cannot avail this method and the most worst thing about this method is 30$ fees per wire.
If you want to earn so believe me ODesk is the best way to earn lots of $$$ in short span of time.

How-to-embed-YOUTUBE video,movie in your blog


This post explains, how to embed(insert) a youtube video in your blogger blog:
So,you want to embed a video(movie) onto your blog.The process is very simple,even a dummie can do it.If you want to embed your original video,then first sign up for an account in youtube and upload your video and get the embed code.
Otherwise,you can easily embed any public youtube video in your blog.Go to youtube.com and search for the video.For example,if you want to embed a britney spears video,search it and copy the embed code on to a
windows notepad or anything else.
The following process is explained below with pictures for easy understanding.
1.Go to youtube.com and search for your required video
enter your search item and click the search button
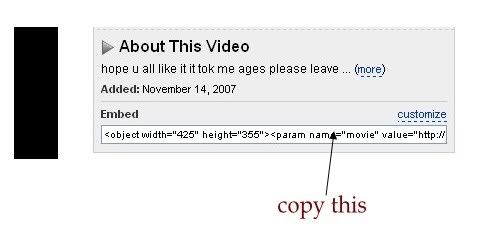
2.Copy the embeded code(ctrl+c) and paste(ctrl+v) it in windows notepad.


copy the copy the html code from the box provided

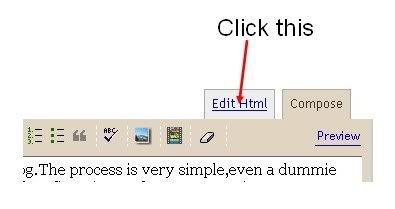
3.Sign in in to your blogger acoount and click the New Post button and next,select the option 'Edit html' as shown below and paste the html code as shown below.

click the 'edit html' option as shown here

4.Publish the post.That's it, as you can see now,the youtube video is embeded in your post properly.
NOTE:You can change the width and height of the video by replacing the values to your desirable ones.

Top 5 Ways to get Free One Way Backlinks to your site


How to get Free One Way backlinks to your site
One way backlinks are very critical to any website success. The more one way backlinks pointing to your site, the more your Google Pagerank and the more amount of traffic you will get. This should also increase your sales,etc.
But the thing is.. getting the right and quality one way backlinks from high pagerank sites is not an easy task, and in this article, we'll find out some of the best ways to get free one way backlinks:

1. Try to write as much quality content as you can... that will encourage the readers to link to your site. The more useful, informative content you post, the more likely people are to link it. But, this method can take a while to really pay off because like all the new
websites, you don't get much traffic.

2. Write quality articles and submit them to top article directories like ezinearticles and goarticles. The advantage in this is, you'll not only get a backlink from high pagerank directories, but also you'll find that your articles are used on other people's sites with a backlink to your site.

3. Participate in forums,discussion boards that are related to your website's niche and add a link to your site in the signature. Make sure that you write quality posts, don't spam. This will also help you get some decent traffic to your site.

4. There is absolutely nothing wrong to get a backlink from a related blog post you decide to comment on. This is one of the effective way of one way link building especially if you comment often on blogs. Comment on blogs related to your niche with a link back to your site as your signature.. and Again, make sure you never spam.

5. Submit your site link to major, well known web directories. Getting listed in directories related to your site not only bring you tons of targetted traffic, but will also improve your search engine rankings. Some of the popular directories to get listed in are DMOZ directory and Yahoo directory. You can submit your link to both paid and free directories and they worth your time.

Learn how to hide,disable or remove the blogger navbar(navigation bar) from your blog. First,let us see what blogger navbar is


blogger navbar

Blogger navbar allows users to easily navigate to other random blogs and it also has a feauture to search the blogs ,and mark any blog as spam.
So,now you have a clear idea of what really a blogger navbar is.So, why so many people prefer to just remove the navbar inspite of the feautures it has like search,etc.Many people think that, it spoils the look of
the blog,especially if your blog has differnet subtitle layout which looks too obvious to see for a visitor.Well, let me come to the actual point on how to disable or hide your blogger navbar.

Below is the step-by-step procedure on how to do it with photos to make it easy to understand.

1.Sign in to your blogger account and click the layout button next to your blog name

click the layout button

2.Next,click the edit html tab as shown in the below picture.


edit html

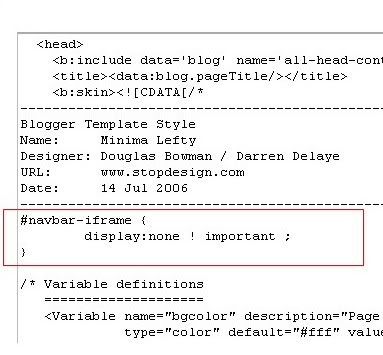
3.Add the below html code as specified in the below picture.
#navbar {
height: 0px;
visibility: hidden;
display: none;
}


add the code like this

4. Save the changes.

Now, you can see your blog without that navbar(this tip can only hides the navbar,it doesn't completely delete it).If you want the navbar to appear again,just remove that code and save the changes.
If you have any doubts,regarding this post,don't hesitate to ask.You can ask your doubts via comments to this post.

What is Wp Syndicator and How it works

What is Wp Syndicator and How it works:

 Download Wordpress Plugin WP Syndicator Free

WP Syndicator is a powerful WordPress plug-in that automatically

syndicates your content across a number of popular Web 2.0 authority websites.

By syndicating your content you will benefit in several ways:

1. An increase in traffic especially from micro-blogging sites
within your syndication network.

2. Improved search engine ranking through an increase in your link popularity together with better initial indexing.

3. Automatic deep linking to every syndicated blog post from
high status and authority sites.

4. A significant saving in time versus manual content syndication.

WP Syndicator will really benefit any wordpress blogger,
especially those people seeking a competitive advantage in the
search engines
Click Here to download WP Syndicator Free

Download Free SMS Bomber


password : www.realhackingtips.blogspot.com